Pages

Showing posts with label How to. Show all posts

Sunday, 22 September 2013

Using the amazing Prelinger Archives to create video mashups

A slight departure from my normal posts here, but thought it worthwhile as it is definitely computer-related. Those who like playing around with video editing software, perhaps for home movies, special occasions or even work use, often get stuck looking for free stock footage they can use to add a bit of variety to their creations.

One amazing resource that's often overlooked is the Prelinger Archives, which is available at the Internet Archive . Everything in the Archive is in the public domain, meaning it can be used for any purpose whatsoever - even commercial use - with no permission or licence fee needed. You can download the clips in a variety of formats, such as MP4, MPEG-2 or Ogg video files.

Of course, the biggest problem is finding suitable material. Luckily, there is a decent search feature, but even this is not totally reliable. Many of the home movies are untitled and have not been indexed, so it's sometimes pot luck what they contain. I found that using the search box at the top of the home page gave better results than using the keyword search.

One very useful feature is the thumbnails - if you open a clip's page, on the top left is a link to thumbnail images, which are automatically created every 30 seconds or so for the duration of the clip. This is very useful for getting a rapid idea of what's in the clip.

The range of content in the Archive is amazing. There are full-length colour documentaries, music clips, silent movies, home movies, educational films and all manner of more weird stuff from most periods of the 20th Century. It's an incredible resource, not just historically, but also for those looking for interesting video or sound clips to spice up a home movie or business presentation.

As an example of what can be done with it, here's a 5-minute music video I recently made using only material from the Prelinger Archives (the music is a reworking of one of my own songs by the talented Barry Snaith). It took about 2 weeks to make in my spare time, and most of the time was taken finding the clips.

I used about 16 separate videos from the Archives, mostly home movies and popular music clips. The software I used was Avid Studio (which is now Pinnacle Studio). This has a great collection of professional effects from Red Giant (now only included in the Ultimate version of Pinnacle Studio). Although Avid Studio hasn't had updates for a long time, it does work perfectly well in Windows 8.


Friday, 23 November 2012

Get a free Windows 8 Media Center upgrade

Crazily, Microsoft has removed the excellent Windows Media Center from Windows 8, quoting codec licensing costs as the main reason. It does, however, sell a separate Media Center Pack for Windows 8 Pro that costs £6.99 (Windows 8 standard version needs to be upgraded with the Windows 8 Pro Pack costing £49.99 at the time of writing).

Those already running Windows 8 Pro don't need to pay a penny, as Microsoft is offering free upgrade keys to anyone until 31 January, 2013. Just go to http://windows.microsoft.com/en-GB/windows-8/feature-packs and enter your email address. There are no limits, apart from one key per email address. Once the key is received, it can be added to Windows using the Add Features to Windows 8 tool (just search for this from the Start screen, and it appears in the Settings results). Click 'I already have a product key' and enter the key. The upgrade will take place, and Media Center will be available after the restart. It is unchanged from the Windows 7 version, and still works with up to three analogue or digital TV tuners.


Friday, 26 October 2012

Free check for Windows 8 compatibility

With the launch of Windows 8, Microsoft has reintroduced the free Windows 8 Compatibility Assistant for those contemplating an upgrade, but unsure whether their hardware or software is up to the job.

It can be downloaded from the Windows store at http://windows.microsoft.com/en-GB/windows-8/upgrade-to-windows-8

There's no need to purchase Windows 8 in order to run this. Users can also check the compatibility of specific software or devices at the Windows Compatibility Center.

Saturday, 29 September 2012

How to restore missing mapped network shares

I mostly use Passmark's excellent Performance Test 7 for testing NAS performance (I do use some other tools as well, such as Xbit Labs' ancient but handy FC-Test).

It has served me well for several years, but I have occasionally come across a problem that stumped me. When I set up the NAS for testing, I create a mapped share in Windows, as Performance Test only recognises mapped drives, not UNC paths. A couple of times I've done this, the mapped share was not visible from the Preferences menu in Performance Test, so I couldn't set it up to run the tests. It completely baffled me, as the shares were visible in Explorer and other applications, and could be used as normal.

This happened again recentlly, but this time in Windows 8 RTM, so I decided to have a look on Passmark's site to see if there were any known Windows 8-related isssues. Although there were none, I spotted an entry in the Performance Test FAQ called 'Why can't I select a network drive for testing?'. And sure enough, the problem was revealed.

It turns out that there is a glitch related to the User Account Control (UAC) from Vista onwards. The cause is that UAC actually treats user accounts in the Adminstrators group as standard users. It's rather convoluted (as explained in this MS KnowlegeBase article), but what it means in practice is that if you map a network drive while logged on as standard user or Administrator, any programs that run with elevated admin privileges (such as Performance Test) will not be able to access those mapped drives.

One cure is to turn off UAC completely, but that's not really a wise move. The other, as documented in the MS article above, is to make a change to the Registry. Here's the procedure in detail, paraphrased from Microsoft:


  • Open Regedit by pressing the Windows logo key + R, then type 'regedit' into the box and press Enter
  • In the left pane, navigate to the following key: HKEY_LOCAL_MACHINE\SOFTWARE\Microsoft\Windows\CurrentVersion\Policies\System
  • Click on a blank area in the right pane and choose New, then DWORD Value (choose 32-bit if using Windows 64-bit). 
  • Change the name of this new item to EnableLinkedConnections,
  • Double-click the new entry and change its value to 1, then click OK.
  • Close Regedit and restart the PC.


It's very straightforward, and worked first time for me. Now all apps can, including Performance Test, can see the mapped drives with no problem.

I should reiterate that this is only a fix if your mapped drives are not visible from within an application that runs with elevated privileges - in my case, everything was normal except from within Performance Test.


Thursday, 19 July 2012

How to open a Cisco Linksys EA4500 router

When testing routers, I usually try and take them apart to get a photo of the insides. Frequently I have to give up as I would end up damaging them, something I always feel guilty about. The favourite trick for manufacturers is to hide the securing screws for the case, usually under rubber feet or warranty labels. But with the latest Cisco Linksys EA4500 (and, I think, the E4200 v2, which is identical), I found the sneakiest trick yet.

On the underside are four small feet that look as though they are part of the case moulding. At least that's what I thought, and I spent a while trying to unsuccessfully prise open the case. After scouring around for help, I spotted some FCC internal photos over at  Infodepot and noticed four screw holes in the base. Peering more closely I realised that the feet are actually plastic plugs cunningly disguised to match the moulding. Prise these out (they are not glued and come out quite easily using a fingernail) and remove the screws, and the top comes off easily.


And in case you're wondering, once you have the top off, this is what you will find inside:

The inside of the EA4500 doesn't reveal much apart from the 6  folded metal antennas. All chips are covered by heatsinks


Thursday, 24 May 2012

Watch out for dodgy network ports

Doing some powerline testing recently, I noticed something odd going on with one pair of adapters. The performance seemed to vary randomly between test runs. All the lights were showing a good link, and the tests showed no other anomalies, but because the variation was so high (fluctuating between 90Mbps and 135Mbps) I dug a bit deeper.

The first thing I did was to reset the adapters to factory defaults, but with no joy. So I changed the network cable, a favourite pastime, but again no luck. Then when I was plugging in another cable I spotted something odd in the network port on one of the adaptors. The gold sprung contacts didn't seem regular, and on closer inspection one of them appeared bent. I tried wiggling it with a fine screwdriver but it didn't want to budge. Sure enough, wiggling the network cable during a test allowed me to recreate the problem on demand.

The far pin was the culprit

Bent or damaged pins do stand out. But they are difficult to fix.

We take network ports for granted, but they are very easily damaged - I have no idea how this happened, but as powerline adapters tend to get left lying around, it was most likely to have been a foreign object, possibly attached to a small human being's hand.

Checking out the network connector pinout diagram here, I discovered that it was Pin 8 that was damaged. This is interesting, as for 10/100Mbps Ethernet, this pin is unused. But for Gigabit Ethernet it carries the BI_DD- signal, apparently. So if this was intermittent, the connection would keep switching between 100Mbps and 1000Mbps, which would neatly explain the performance difference, as the lower rate would be maxing out a 100Mbps connection.

The moral is, if you have network performance problems, or you can only get 100Mbps out of a 1000Mbps network device, it's always worth checking the ports themselves (there are other causes, however). It only takes a second, and bent, misaligned or damaged connectors really do stand out a mile when you look.

On a side note, it also highlights why, whenever running performance tests, you should always repeat them several times, something constantly drummed into me during my PC Mag Labs years.

Tuesday, 14 February 2012

How to use a router emulator for troubleshooting

If you've ever tried to help a friend, colleague or family member sort out a router problem over the phone or via email, you'll know what a hopeless task it can be. Unless you are familiar with the particular router's features and admin interface, you have little chance beyond 'turn it off and then on again', especially if the other person isn't very computer-savvy.

A great tool to help in such cases is the router emulator, which is really just a demo version of the router's admin interface that looks and operates like the real thing without being attached to a real router. Quite a few manufacturers provide these, but they rarely make it easy to find them (TP-Link is a notable exception) on their support websites.

The Trendnet emulator for one of its access points

Of course, it helps if you can find the correct product-specific emulator, but in fact as most manufacturers use a generic interface for all their products, this isn't as big a problem as you might think - the menu structure is usually identical, as are the basic settings. Product-specific settings (such as a second Wifi radio) might not be there, but there's usually enough similarity to enable you to help guide someone through using the interface.

I've been looking around for emulators for a while, and I've come up with the following list of manufacturers who provide them. It's not comprehensive, and usually the latest models are not there, but it's a start. If you know of any others, feel free to leave a comment.

No special software is needed to use these - just point your browser at the correct link and the interface should appear. And don't worry, you can't harm anything, so feel free to mess with any settings you fancy. It's also a good way to check out what a particular manufacturer's router interface looks like before you buy a new router.


DD-WRT 
D-Link
Draytek
Linksys 
Netgear 
TP-Link

Sunday, 1 January 2012

Cyberpower DX800E GreenPower UPS

I was recently commissioned to write an article on surge protection and uninterruptible power supplies (UPS) for Computeractive, which gave me a great excuse to finally buy myself a UPS. I used to own an ancient Belkin model that died a couple of years ago (almost taking my PC with it), and have never got around to replacing it.

I have two main work PCs - my Windows desktop and my self-built Windows Home Server. I also have a media PC, but as all its data is stored on the WHS box, it doesn’t really need a UPS.  Using my Maplin plug-in power meter, I found that the desktop (which has a 2.93GHz Pentium Core 2 Extreme X6800 CPU) averages out at around 120W in use, and the WHS box (with a 3.4GHZ Pentium 4 Extreme Edition) rarely moves above 80W.
I also wanted to protect my Acer X223HQ 22in monitor, which uses about 60W maximum, giving a total of 260W. Doubling this to give some extra running time on battery meant I needed a UPS with a rating of about 800VA (using the rule-of-thumb of multiplying the VA figure  by 0.6 to get Watts).
I had to brush up my fading memory about the different types of UPS, and I got sidetracked for a while reading about ‘pure sine-wave’ line interactive models. This is pretty much a red herring for the average domestic user  - the ‘stepped approximation to a sine wave’ (or ‘simulated sine wave’) output used in most low-cost standby (off-line) models is perfectly fine for the vast majority of users. My PCs both use modern, good-quality Active PFC PSUs from BeQuiet, and they weren’t fussed by my eventual choice of a model with a stepped output.

The confusion arises because some PC PSUs using active power factor correction (Active PFC) can trigger an overload condition on some UPS models when they turn on - APC has an explanation in its knowledge base. All PSUs sold in Europe have had to use PFC for many years, but most use passive PFC, which is a little more tolerant of stepped waveforms. If your PC has an Active PFC PSU, it should be fine, but if it generates overload trips, or turns off when the UPS transitions to battery power, this could be the reason.

Eventually I decided on a Cyberpower GreenPower DX800E standby UPS from Ebuyer, as it was on special offer (£67 including VAT) and matched my needs. It has three AC outlets (two standard UK 13-amp sockets and one IEC socket) and is remarkably small, measuring 235 x 90 x 190mm - I don’t have a lot of room under my desk so this is a real benefit. There’s just one on/off button, three status lights and a charge level indicator on the top.

The DX800E is very compact


After charging it for the recommended eight hours, I plugged it in and everything worked fine. Unplugging the mains kicked the inverter into action as it should. The UPS comes with Cyberpower’s nifty PowerPanel software monitoring tool (the UPS is connected via USB, with a cable included in the box), and I tried this on the desktop PC. For Windows 7 users there’s also a desktop gadget that shows several parameters - input voltage, estimated standby time and so on.

The PowerPanel software is very good

There's also a desktop gadget for Windows 7 users


However, I wanted to connect the USB cable to my WHS box as this runs 18 hours a day without a monitor, keyboard or mouse and so is awkward to shut down in a hurry. I use the excellent free Grid Junction WHS add-in, which recognised the UPS with no problem. This shuts down the system automatically when the battery drops below 80% charge (which is after about 2-3 minutes with all devices plugged in). I will rely on shutting the desktop PC down manually - when I’m not using it it’s always in hybrid sleep mode anyway, so a loss of power won’t affect it.
The Grid Junction WHS add-in ensures a graceful shutdown when the power fails

I’m very happy so far with this bargain UPS, although a minor niggle is that it doesn’t come with an IEC C20 power cable. The battery is supposed to be replaceable, but Cyberpower doesn’t sell these and just says that it uses a ‘universal’ 8.5AH battery. I haven't taken it apart yet, but I reckon it’s unlikely to be cost effective to replace - if I get a couple of years' use out of it I'll be more than happy.


Find it on Amazon:

Tuesday, 25 October 2011

Feature: How to upgrade a home network

Here's a link to a recent feature I wrote for one of the Computeractive Ultimate Guide series. It's aimed at less experienced users and shows how to upgrade most parts of a home network, with the emphasis being on affordable solutions.


Thursday, 13 October 2011

How to fix the WHS 'cqvsvc.exe' error and Media Center's Console View

Today, I'm a very happy man. Ever since I upgraded my WHS system to Power Pack 3 a couple of years ago, there has been an incredibly annoying glitch related to the WHS Media Center Connector service, and after months of searching I finally stumbled on an answer. Hooray!

The main problem has been that, apart from a brief period when I first installed the Media Center Connector, the Console View tab refuses to work, giving an error message. Also, on the WHS system, looking at the Application section of Event Viewer revealed that a service called Cqvsvc.exe (which is the Console Quick View Service) was generating an error every minute of every day. For nearly two years.

It wasn't causing any system problems or instability as far as I'm aware (the TV Archive service was working perfectly), and my WHS system has been as steady as a rock ever since I built it in 2009.

However, it was incredibly annoying to see these messages, and not to be able to view the Console status in my Media Center PC, which is my secondary living room PC. (I also run Media Center on my main work PC, mainly for recording odd programs via RF from my Virgin Media cable TV box).

I've regularly trawled around various sites and forums looking for an answer, but it came to a head today when I tried to install the WHS Health add-in and it failed with an error relating to the non-existence of health.xml in the WHS C:\inetpub\intranet\health\ directory. Eh?

Turns out this file is where Cqsvc.exe gets its health info from, and so if it doesn't exist, an error is generated.  The specific error I was getting in the Event Viewer was Error 9000, "System.Management.ManagementException", with a further description of "Invalid class"


(On a separate note, it seems from my investigations that there are many different error messages caused by Cqvsvc.exe, and the fix here may well only apply to this particular error, so I can't guarantee results).


The first thing to try if you're having this error is to try and look at the health.xml file. It's located at http://[servername]:55000/health/health.xml  (substitute your WHS server's name for [servername]) - put this into a browser and you should see the file appear. It looks like this:


If instead you get an error message, the chances are that the file hasn't been created, as in my case, due to the Cqvsvc.exe problem.


I found the fix on this thread on the MS Home Server forums (scroll down to a reply from Donald Lu, who appears to be a Microsoft employee - thanks, Donald!). To run it, open Remote Desktop connection to WHS machine, then open a command prompt (press the Windows key and R, then type 'cmd' in the Open box and press Enter).

Now type:

winmgmt /resyncperf

then press Enter. And that's it!


There will be no messages in the command prompt, so just close it. You don't even need to reboot the machine. Now try opening the health.xml file again as described above - it should now be there. And the Media Center Console view should be working, just like this:


I hope this helps anyone who, like me, has been driven to distraction by this problem.

Monday, 8 August 2011

Feature: Solve problems with your computer

Here's a link to a cover feature I wrote for issue 350 of Computeractive. It shows how to fix dozens of common Windows problems and error messages, and is aimed at less experienced users.

Wednesday, 13 July 2011

Feature: Fix common PC errors

Here's a link to a cover feature I wrote for the print edition of Computeractive (issue 347), listing 30 fixes for common computing mistakes.


Monday, 28 February 2011

How to connect E.On's Energy Fit monitor to the web

For a couple of months now I've had a widget at the bottom of this blog's sidebar that displays the current electricity usage and temperature in my house. If you've been wondering how that works, the secret lies in the free energy monitor that E.On is offering its customers as part of its Energy Fit campaign. I got one of these late last year, but it was faulty and had to be replaced early in the new year.


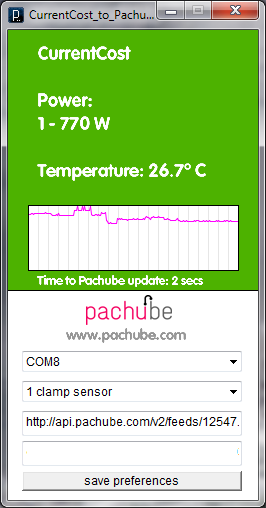
The meter that E.On supplies is actually a CurrentCost EnviR model worth about £50, and it handily comes with a USB PC connector to interface with E.On's monitoring software. This is awful, but to create the widget you don't need it - all you need is to create a free account at Pachube. This a very interesting web service that lets you create XML feeds to share data from almost any environmental sensor. There's also a collection of widgets and apps built by users for displaying this data in web pages. First you have to create a feed by getting a master API key - Pachube walks you through this procedure, which is fairly simple. All Pachube's free feeds are public - for example, mine is http://api.pachube.com/v2/feeds/12547.xml (this shows the current values and feed coordinates).


To get the data from the meter to Pachube, I use the free CurrentCost to Pachube app. This queries the meter every minute over the USB interface, then uploads the data to the Pachube feed. Then to display the data on my blog, I use the PachuDial widget. This takes the feed details you supply and then generates the necessary HTML code to put in one of Blogger's sidebar gadgets. The graphs below are also using live data from the Pachube feed.

It's just a bit of fun, but a fascinating little example of the 'internet of things'. 


Friday, 11 February 2011

How to remove network names in Windows 7

Networking in Windows 7 is generally pretty simple, apart from the unecessarily complicated Network and Sharing Center. But one annoyance when you connect to a lot of different networks, as I do, is that it refuses to forget the name of a network. So you can end up with multiple network names, such as Network 4, Network 7 and so on. This isn't really a big problem, but if you need to start with a clean sheet (I need to do this sometimes for screenshots), it's not obvious how to delete the list of known network names. But in fact it is very simple.

First, open the Network and Sharing Center by clicking on the network icon in the notification area. Next to the current network name is a large icon, in this case a house representing a Home network (Note that it is the larger icon in the 'View your active networks' section I am referring to - thanks to the commenter who pointed this out).


Click on the house icon and a Set Network Properties dialog box will appear that allows you to rename the current network and optionally change the icon.


But we want to delete other network names, so click on the link at the bottom labelled Merge or Delete Network Locations.


Now you'll see a complete list of all the network locations your PC has connected to. Select those you want to get rid of - you can't delete them all at once, as selecting multiple names activates the Merge option. This lets you combine all the networks into a single name - I'm not too sure what use this is. Note that you can't delete any networks that are currently in use.

Update: As one kind commenter has pointed out below, you can delete multiple names by selecting them with Shift-click or Ctrl-click, then pressing Delete. Just make sure that none of the networks selected has an 'In Use' status, which is what I did - if you do this, the Delete button will be greyed out.

Saturday, 29 January 2011

How to upgrade an Aspire One to 450Mbps Wifi

I've owned an Acer Aspire One (model AOA150) netbook since mid-2009, and it's become an indispensable tool around my office for general surfing and, more commonly, testing wireless networking kit. As the integrated Wifi is only 54Mbps 802.11g, I have a couple of 802.11n USB dongles for this - a Fritz! WLAN dual-radio/dual-stream (300Mbps)and a Tenda W311U
2.4GHz/single-stream (150Mbps).

But with triple-stream 450Mbps routers starting to trickle onto the market (I hope to review the TP-Link TL-WR2843ND when it appears in a couple of months) , I wanted to get ready to test these, so I started looking around for suitable 450Mbps USB dongles. I quickly found that these don't seem to exist yet, but I did make a very interesting discovery.

While writing the news piece about the TP-Link router for ZDNet UK, I was trying to find examples of 450Mbps-capable notebooks. To my surprise, I came across several, all using the Intel Ultimate N WiFi Link 5300 internal adapter. It turns out that this adapter has been on the market for a couple of years, and is one of the only ones to use a full three-stream (3T3R) MIMO implementation, making it capable of 450Mbps connections with a suitable router. It's also a dual-radio (2.4/5GHz) model, and what's even better is that it's available as a full-height mini-PCI Express card, which is the adapter format used in the Aspire One.

This shows the full-height  (left) and half-height versions of the Intel 5300 adapter

But I wasn't sure whether it was practical to upgrade the Aspire One, until I came across a great article on the Aspire One User Forum. This confirmed to me that it was worth a try, so off I went to find an adapter. In the end, I found one from the same source as the person in the how-to article - Ebay seller Justopeshop. It was £29.99 with free delivery, and also included a free third antenna.

I found the above article very accurate and easy to follow, although the third antenna wasn't as easy to fit since it was much wider (in fact, identical to the originals in the Acer). So I had to remove the entire LCD panel (four screws plus two small cables for the webcam and microphone) in order to cut a small piece out of the aluminium foil shielding behind it. This allowed the antenna's PCB to slip halfway under the panel (as the originals do) and sit neatly in the panel surround. There was no need for superglue as the antenna had double-sided tape on it. It's not ideally located, of course, as MIMO antennas are supposed to be spaced about 12cm apart, but there's not much I can do about that.

The whole job took a couple of hours, and it all went back together without a hitch, although it is a very fiddly process. Turning it back on confirmed I'd done everything right, and Windows 7 discovered the driver immediately from Windows Update. One bonus is that this adapter supports Intel's My WiFi virtual router technology, allowing the notebook to be used as a Wifi hotspot. But I didn't like the software much so I got rid of it and used Connectify instead.

Connecting to my Fritz!Box router gave me a 300Mbps link speed (obviously I can't test the 450Mbps capability until I get a suitable router), and a quick run of LAN Test showed throughput of around 60-70Mbps - a vast improvement over the 20Mbps from the original Atheros adapter. I'm very happy with the results, and for just £30 it's an absolute bargain.


Find the Intel 5300AGN adapter on Amazon:

Thursday, 20 January 2011

Check your Sata cables

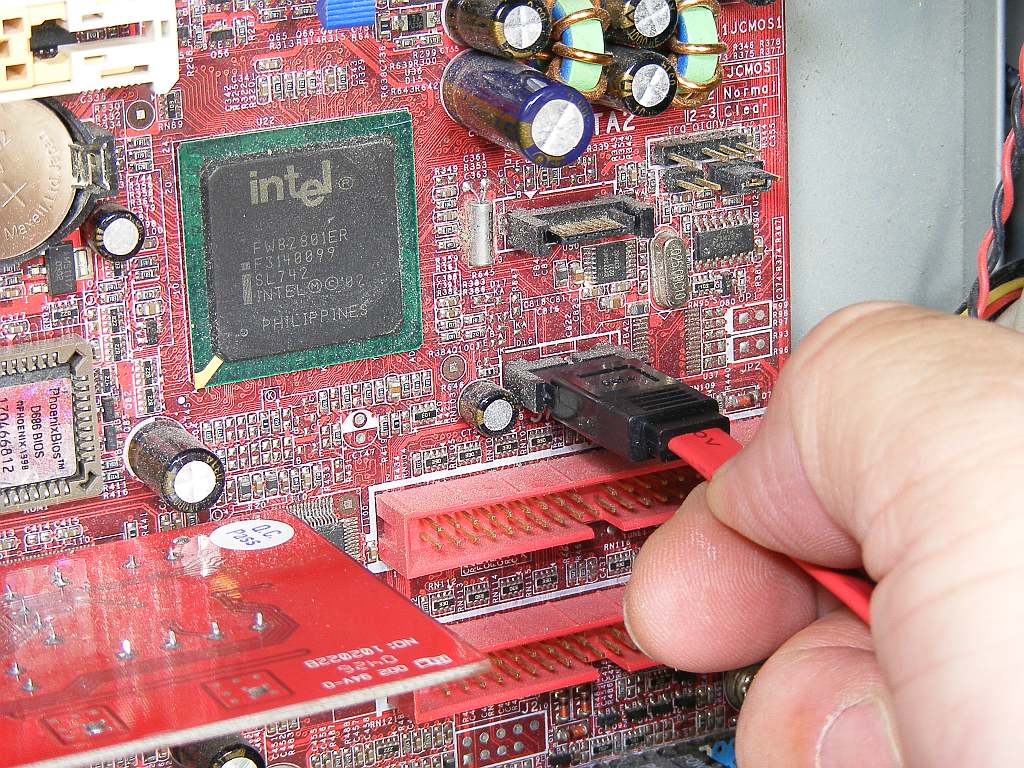
Over the past couple of months, my main Windows 7 work PC has been plagued by intermittent freezes, accompanied by a constantly-lit hard disk access light. After trying to isolate the cause with Resource Monitor, I've put it down to all manner of problems including Google Chrome's cache and anti-virus programs,  but nothing was able to fix it. The freezes could happen two or three times a day, or go away for a couple of days, and I would also get CHKDSK kicking in three or four times a month when the PC was rebooted. I was starting to worry that the hard disk itself was on the way out, but CHKDSK never returned any errors and the SMART monitoring status showed no problems.

In desperation, after seeing a couple of entries in Event Viewer relating to errors on a Sata port, I tried reseating the Sata hard disk cable into another port, but no luck. So then I tried using a different Sata cable, and hey presto! - the problem went away, and my PC hasn't frozen for over two weeks. Bizarre, but all I can guess is that there was some marginal problem with the cable. The moral is that it's often easy to blame software for PC problems, but never forget that anything with a bit of wire inside it can fail too.

Sata cables can fail, too


Saturday, 1 January 2011

Beware the Fritz!Box 7390's 'green' LAN mode

I've just been testing a D-Link smart switch, and due to limited space on my desk had to stick this in front of my cheapo Belkin 8-port Gigabit switch (F5D5141-8v3). This meant the link status LEDs were hidden from view. Having finished the review and packed up the D-Link, I noticed that the uplink to the Fritz!Box 7390 (which I have on long-term loan) was only running at 100Mbps. Puzzled, I tried connecting the PC direct to the Fritz!Box, with the same result - all the LAN ports were running at this lower speed.

Thinking it might be the new firmware upgrade, I tried to think of something that might have changed. For some reason I thought of the 'green' LAN feature, so I checked it and noted that the ports were set to automatic 'green' mode. I changed this to 'always on' and hey presto, the link speed changed to 1Gbps. I wasn't sure why, though, but checking the help file revealed all - the 'green' mode just reduces the port's speed to 100Mbps when a device is connected. Obviously, this does help the Fritz!Box save power, but for some reason I thought that it did other clever things like reducing signal strength for short cables, like some other networking kit I've seen (D-Link's Green Ethernet technology is an example). It does turn off power to unused ports, however.

So be careful activating the green function if you need full-speed LAN connections - one of the few annoying things about the Fritz!Box is the lack of visible port status information - and even in the web interface there's no indication of the active link speeds. The safest compromise between speed and power consumption is to set all ports to the 'Identify Automatically (Power Mode)' setting - this runs ports at the full 1Gbps, but turns them off when there's no cable connected.

Don't do this if you want a full-speed LAN

UPDATE 31/1/2011: I've corrected parts of this article, as the Fritz!Box 7390 does turn off power to LAN ports with no device connected, unless the 'Always Enabled' setting is used.

UPATE 19/9/2012: The latest FritzOS 5 firmware adds the details of port speeds to the energy settings screen shown above.

Tuesday, 9 November 2010

How to fix the 'Cannot mount the backup' problem in WHS

Regular readers will know that I'm an ardent fan and user of Windows Home Server (WHS). Last year I built my own system to look after my three PCs, a job that it's done admirably, despite a couple of failed drives (note: never put ancient drives in USB enclosures, it's a false economy!).

But the other day I decided to check some old versions of files using WHS's file and folder restore facility, which temporarily loads a backup set as a Windows volume. The progress window on the WHS console got to 100%, but on the Windows 7 client window it always stopped at 81% before popping up an error message saying 'Cannot mount the backup'. This was very frustrating, as mounting the backups worked fine on my other two PCs, so it obviously wasn't a WHS issue.

WHS can mount backed up partitions as Windows volumes. Sometimes.

Looking around the various WHS forums, I found several suggestions for a fix, none of which worked. Eventually, a post on the We Got Served forums led me to a thread on the Microsoft forums which mentioned a problem with Diskpart. I tried this and it worked first time, although I've no idea why automount was disabled in the first place.

Here's the fix:

  1. Right-click the Command Prompt icon and choose 'Run as administrator'. (Command Prompt is located in All Programs, Accessories).
  2. Type 'diskpart'. After a couple of seconds the prompt will change to 'DISKPART >'.
  3. Type 'automount enable' and press Enter. You should see a confirmation message.
  4. Type 'exit' to quit Diskpart and 'exit' again to quit the command prompt.


Try mounting the backup partition again via the WHS console and it should now work. It seems as though there may be multiple causes for this behaviour, so I'm not guaranteeing it will work for everyone.

Update  20/11/2011: To those who are worried that this problem means that the backups themselves are corrupted, don't panic - the problem is caused by the client PC, not the WHS backups. The backups are perfectly safe and you should still be able to perform a full system restore from the backups, using the WHS client restore disc. The problem discussed here only affects the ability to restore individual files and folders.

Another thing to check if this fix doesn't work is to make sure that nothing is using the Z: drive. In Explorer, click Tools, Disconnect Network Drive. Highlight anything using the Z: drive and click OK. You can also do this from the command line. Type 'net use' to see a list of drive mappings. If Z: is in use, remove it by typing 'net use Z: /delete'. This won't delete data from any drive, it just removes the drive mapping.

Thursday, 4 November 2010

How to Write A How-To Article

How-to articles are a great way of explaining to someone how to do something that they don’t already know how to do. Such articles can contain either easy or difficult instructions, depending on how difficult the thing that you’re explaining how to do is. There are even some that have a mixture of easy and difficult instructions, which can be a little tricky. In this five-step how-to article we will explain how to write a successful five-step how-to article that is guaranteed to give know-how to people who don’t know how to.

  1. To get started you should first write Step 1. This is the one that comes before all the others, so make sure you number it with a very clear ‘1’, which is the number key just the left of ‘2’ on most keyboards.
  2. When you have completed the first step, it’s time for the second one. Don’t get carried away and jump to 3 or 4, which sometimes happens when you’re writing quickly.
  3. The third step is often the most difficult to get right, as it comes immediately after Step 2 but before Step 4! A lot of how-to writers forget this, so if you’re getting confused it’s a great idea to note down (any old piece of paper will do) all the steps in a list one above the other in order to remind you which step goes where.
  4. By the time you get to Step 4, you may be getting tired and should take care not to end here. Missing off the last step is never a good idea, as it makes your how-to article look a little amateurish.
  5. Finally it’s time to write the last step, which means that there should be absolutely no more steps after this one! Before you finish, check carefully through all the other steps to make sure that there is the correct number of steps (and that they're in the right order - refer to the list you made in Step 3), and you’re done.

(This was inspired by an article about an editor's experience of working in a 'content farm')

Wednesday, 3 November 2010

How to disable Google Chrome's cache

I like many things about Google Chrome, such as its speed, tab handling and unified search box. But one very annoying feature is the lack of control over the content cache. Yes, you can clear it out using the Options, but there's no obvious way to set the size or disable it.

Why turn off the cache? Well, my Windows 7 PC has been suffering from occasional freezes and stutters for a while, always accompanied by a solidly-lit hard disk light. Chrome always seemed to be involved, and looking at Windows 7's Resource Monitor it was clear that my current anti-virus program (MS Security Essentials) was busy thrashing its way through scanning the cache every time Chrome launched or added files to it. Using the info in a thread on Google's support forums, I found the cache to be almost 1GB in size. (It's located in %userprofile%\Local Settings\Application Data\Google\Chrome\User Data\Default). There are actually two cache folders, Cache and Media Cache.


It turns out there are two command-line switches that can set the cache size. Find the Chrome program icon in the All Programs menu, right click it and choose Properties. In the Target box, add --disk-cache-size=1 --media-cache-size=1 to the end of the command (after ...chrome.exe). 


After doing this, click Tools then Options, go to Under the hood, click Clear Browsing Data, uncheck all the items except Empty the cache, then click Clear browsing data. This clears the cache, and the new parameters prevent it growing again - after several days' use, my cache is only about 20MB.


The benefit was immediate and noticeable: the disk thrashing has now gone, and Chrome freezes less frequently (previously, it would often freeze when the status bar was saying 'Waiting for cache...'). In these days of fast broadband, I really can't see the need for huge content caches.


UPDATE 6/2/11: Seems like my freezing problem went deeper than just Google's cache, and even less likely for the average user to spot - see my newer post about dodgy Sata cables